DOOM Eternal - Graphics Study
Doom Eternal is the successor of Doom 2016. It’s developed using the 7th iteration of id Tech, id Software’s in-house game engine. Doom 2016 has inspired me greatly on a technologic level due to its simplicity and elegance while still having a high visual quality. For Doom Eternal, this is no different. Doom Eternal has improved in many areas of which a few are worth investigating which I will try to cover in this frame breakdown.
This frame breakdown is inspired by Adrian Courreges’s study on Doom 2016. I believe these graphics studies give a lot of insight into how certain rendering problems are solved in a AAA game and are greatly educational. In this breakdown I aim to stay at a high level and not go too in-depth of each rendering technique/pass. Some passes might not be covered here because they are very similar to Doom 2016 and are well covered in Adrian Courreges’s study.
I do want to stress here that these studies are absolutely nothing more than educational. I do not in any way support the reverse engineering for malicious purposes and stealing intellectual property. If you haven’t played the game yet, don’t worry about spoilers! The section I used for this study is in the beginning of the game which doesn’t give away any of the details.
Now, let’s get down to business.
With Id Tech 7, the engine has moved away from OpenGL and is entirely built with a Vulkan backend allowing them to make better use of current generation GPU features, bindless resources in particular.
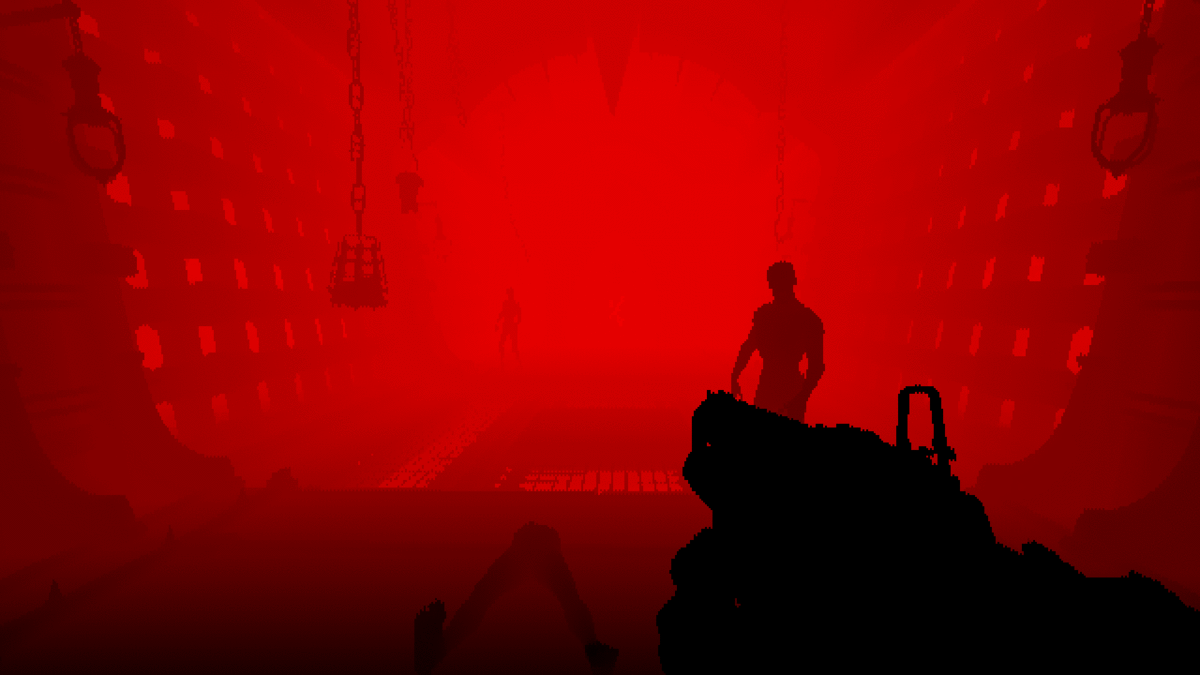
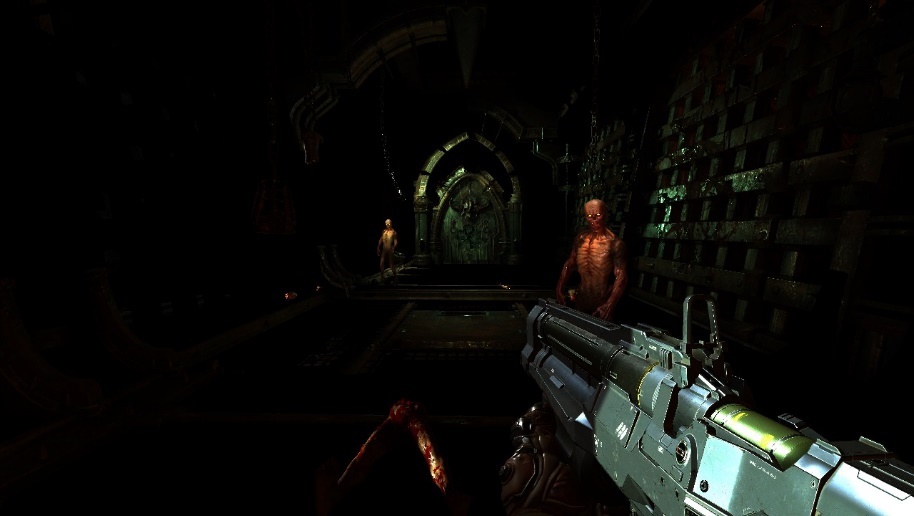
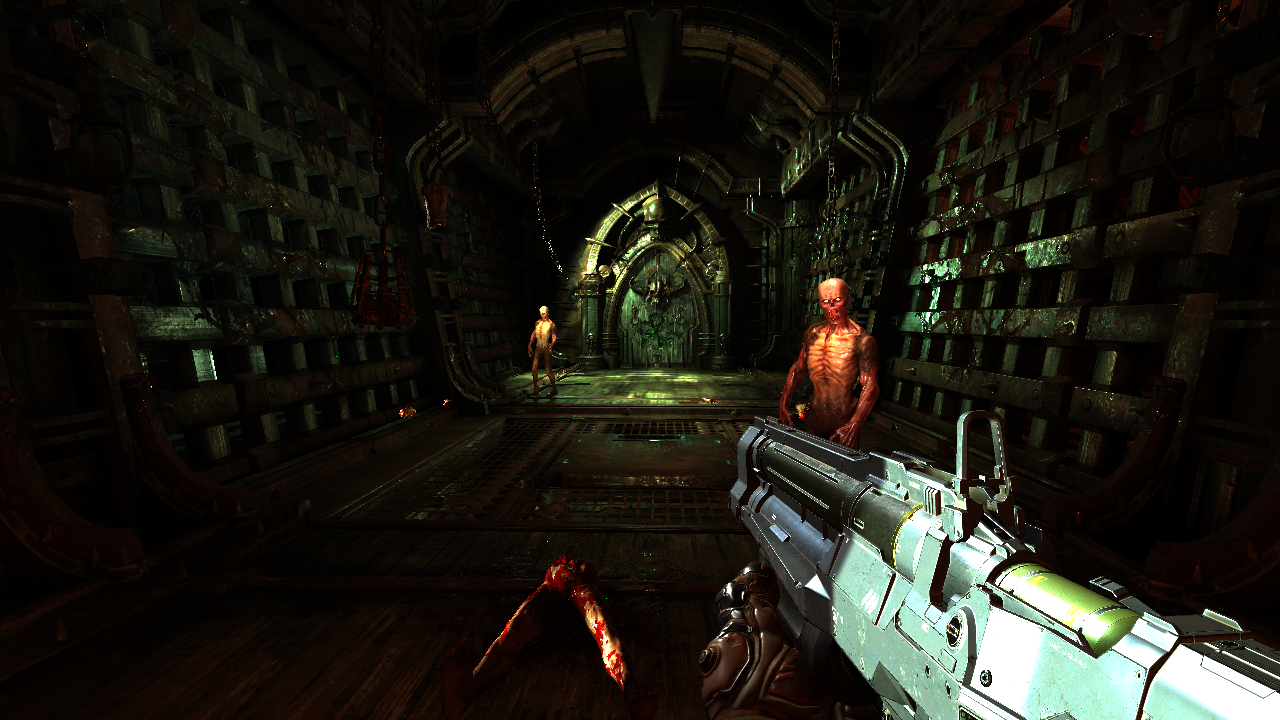
A frame in Doom Eternal
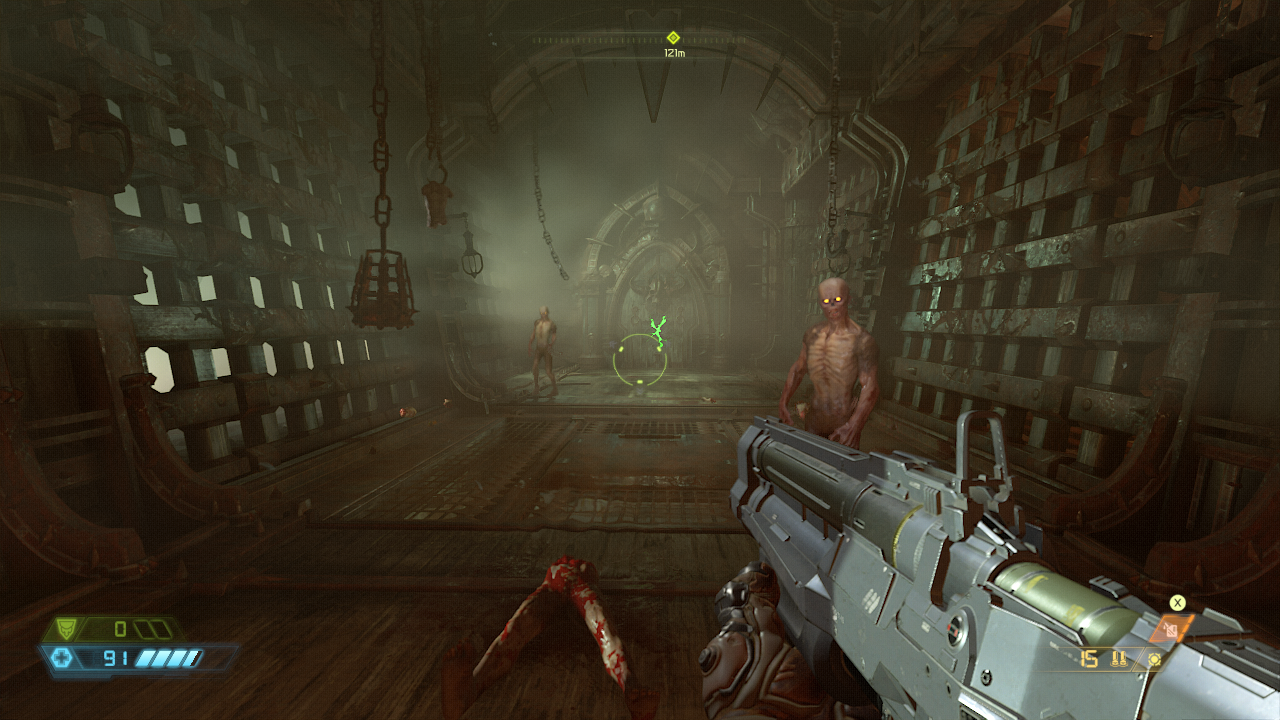
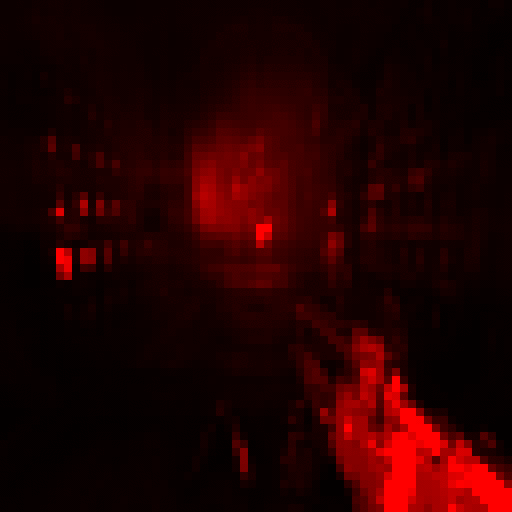
We’re looking at a section in the game close to the start. It’s an interior with a few enemies and a large portion of volumetric lighting. Just like its predecessor, Doom Eternal is using a forward rendering pipeline. Doom 2016 was mostly forward rendered with a thin G-Buffer for screen space reflections. However this time, everything is fully forward rendered omitting the G-Buffer.
Step away from Mega-Texture
With id Tech 5 used in Rage, there was a texture streaming concept introduced called ‘Mega-Texture’ which was also used in the previous Doom installment. This system works by rendering a so called ‘feedback texture’ each frame that contains the information of what texture data was visible, that texture is analysed next frame to determine which textures get streamed in from disk. This has an obvious flaw because once a texture is on screen, it’s basically already too late to load it and this causes blurry textures the first few frames it is on screen. In id Tech 7, id Software has stepped away from this approach.
GPU Skinning
The first thing that happens even before anything gets drawn to a texture, is evaluating skinning. This is commonly done in a vertex shader before shading. An alternative approach used here, is to do skinning beforehand in a compute shader which writes out skinned vertices to a buffer. This has a couple of advantages mainly not having to do skinning in the vertex shader for every geometry pass. This results in having less shader permutations because the vertex shader doesn’t have to know about skinning.
Skinning in a compute shader is not much different from in a vertex shader except that the output gets written to an intermediate buffer which can then be consumed in a vertex shader that can treat it as a regular static mesh. Just like in a vertex shader, for each vertex, a compute shader thread retrieves the transform of each bone affecting the vertex, transforms its position with each bone transform and adds up these positions based on the skin weights stored on the vertex.
János Turánszki wrote a wonderful write-up of how it can be implemented using a compute shader: https://wickedengine.net/2017/09/09/skinning-in-compute-shader/.
Another thing that is worth noting here is the use of Alembic Caches in Doom Eternal. These caches contain baked animation which get streamed and decompressed at runtime. As Digital Foundry described in their tech breakdown, this is used for a wide range of animations going from large cinematic pieces to small tentacles on the floor. This is especially useful for animations that are hard to achieve using skinned animation like organics and cloth simulation. You can compare an Alembic Cache with a video that can be played back and is highly compressed by looking ahead. I suggest watching Axel Gneiting’s talk at Siggraph 2014 if you’re interested in learning more.
Shadow Mapping
Next up is shadow rendering. There doesn’t seem to be any large changes in how shadow maps are approached in id Tech 7 compared to its predecessor.
As seen below, shadows get rendered in a large 4096x8196px 24-bit depth texture which may vary across quality levels. The texture is persistent across frames and as described in “Devil is in the Details” at Siggraph 2016, the static geometry in the shadow map is cached to save having to redraw the shadow maps each frame. The technique is fairly simple: as long as nothing in the view of the light moves, there is no need to update the shadows. If a dynamic object in the frustum moves, a ‘cached’ shadow map is copied into the actual shadow map and the dynamic geometry is re-drawn on top. This cached shadow map is the same shadow map but only with static geometry because you can make the assumption that these will never change. This saves having to draw the entire scene in the frustum every time it needs to update. Of course, when the light moves, the entire scene has to be redrawn from scratch.
When sampling the shadow map during lighting, a 3x3 PCF sampling approach is used to smoothen the shadow edges. For the sun light, cascaded shadow maps are used to distribute the quality better as it covers such a large portion of the environment.
Here is a closer look at the shadow atlas. A light with higher importance, larger screen area or that is closer to the camera, will get a larger portion of the atlas assigned for better resolution. These heuristics are evaluated dynamically.

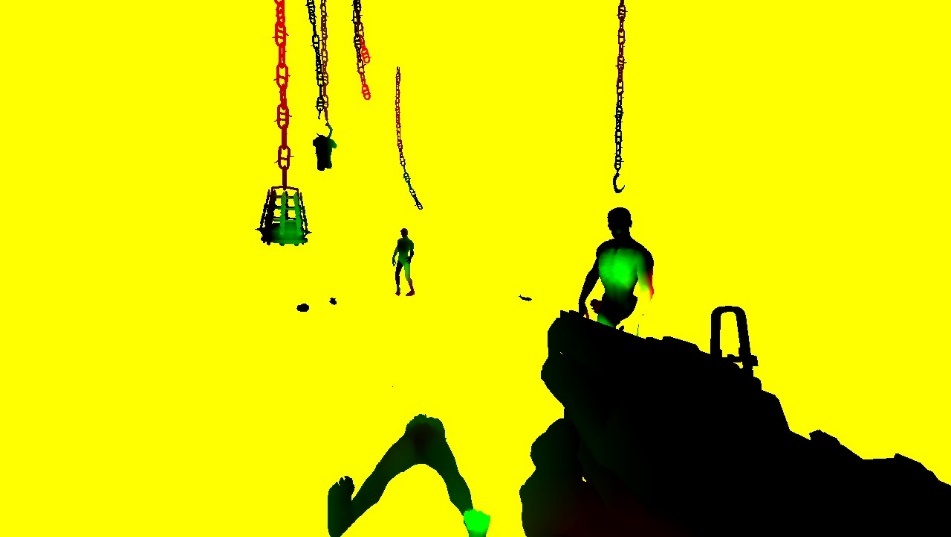
Depth Pre-pass and Velocity
Opaque geometry gets rendered to a depth-only target starting with the player’s gun, then static geometry, and finally dynamic geometry. A depth pre-pass is common to avoid unnecessary pixel shader calculations later down the pipeline where geometry overlaps. A depth pre-pass is especially important in a forward renderer where redundant pixel calculations are extremely wasteful due to pixel overdraw. With a depth pre-pass, the actual forward lighting pixel shader can reject pixels by comparing with the depth buffer before execution, saving a lot of performance.


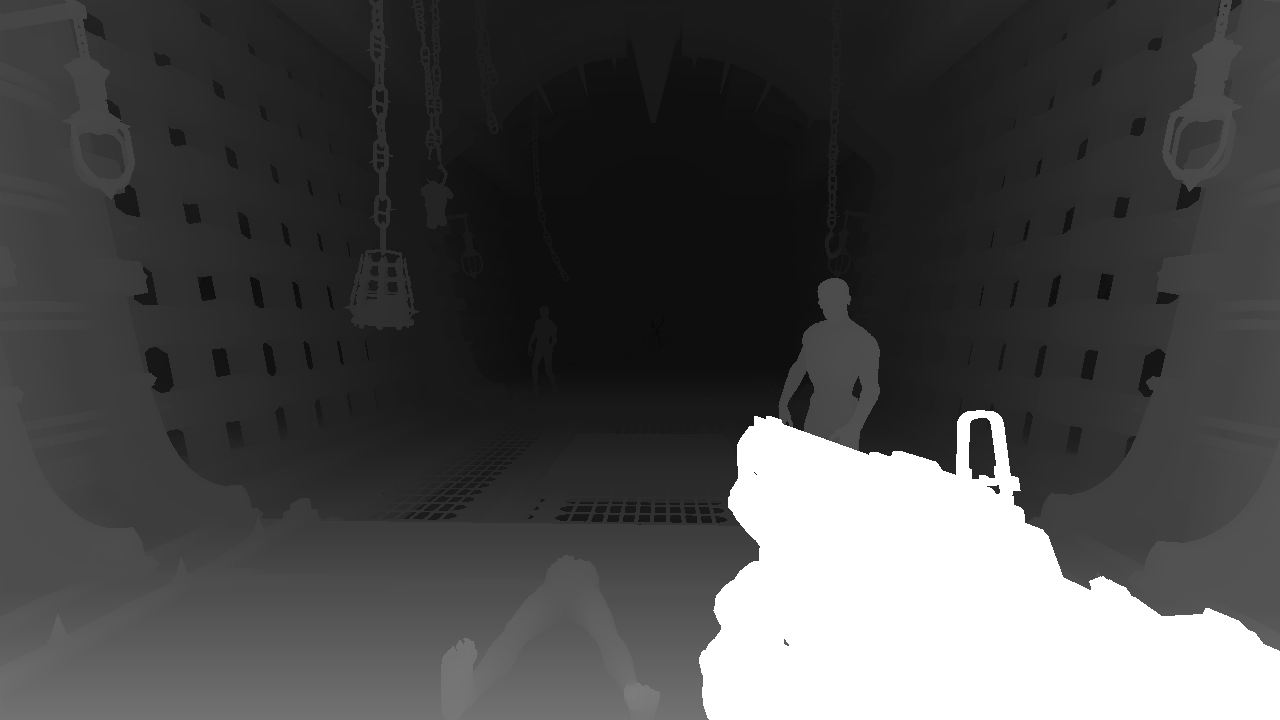
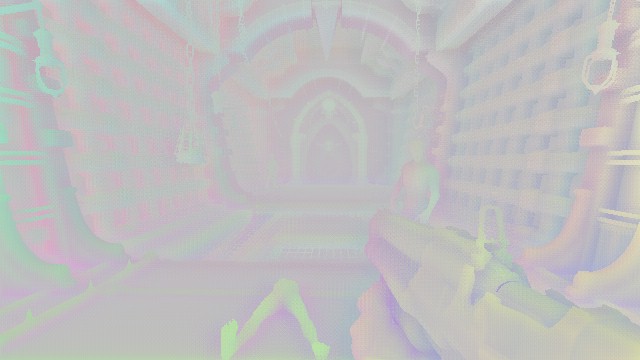
Besides rendering depth, the pre-pass also renders to another color target. For dynamic geometry, the velocity is rendered using motion vectors which is the position of the current position subtracted from the position of the pixel in the previous frame. We only need the motion on the X and Y axis so the motion is stored in the red and green channel of a 16-bit floating point render target. This information is later used in post processing for applying motion blur and reprojection for temporal anti-aliasing. The image below is exaggerated because this snapshot doesn’t have a lot of motion. Static geometry does not need motion vectors as their motion can be derived from the camera motion because they have only “moved” relative to the camera.
Hierarchical-Z Depth
Next up, a hierarchical mip chain of the depth buffer is generated which is similar to a mip map but instead of averaging 4 neighboring pixels, the maximum is taken. This is commonly done in graphics for various purposes like accelerating screen space reflections and occlusion culling. In this case, this mip chain is used to accelerate the light and decal culling which is covered later. More recently, mip generation is done in a single pass by writing into multiple mips at once. In Doom Eternal, it still traditionally does a dispatch for every mip separately.
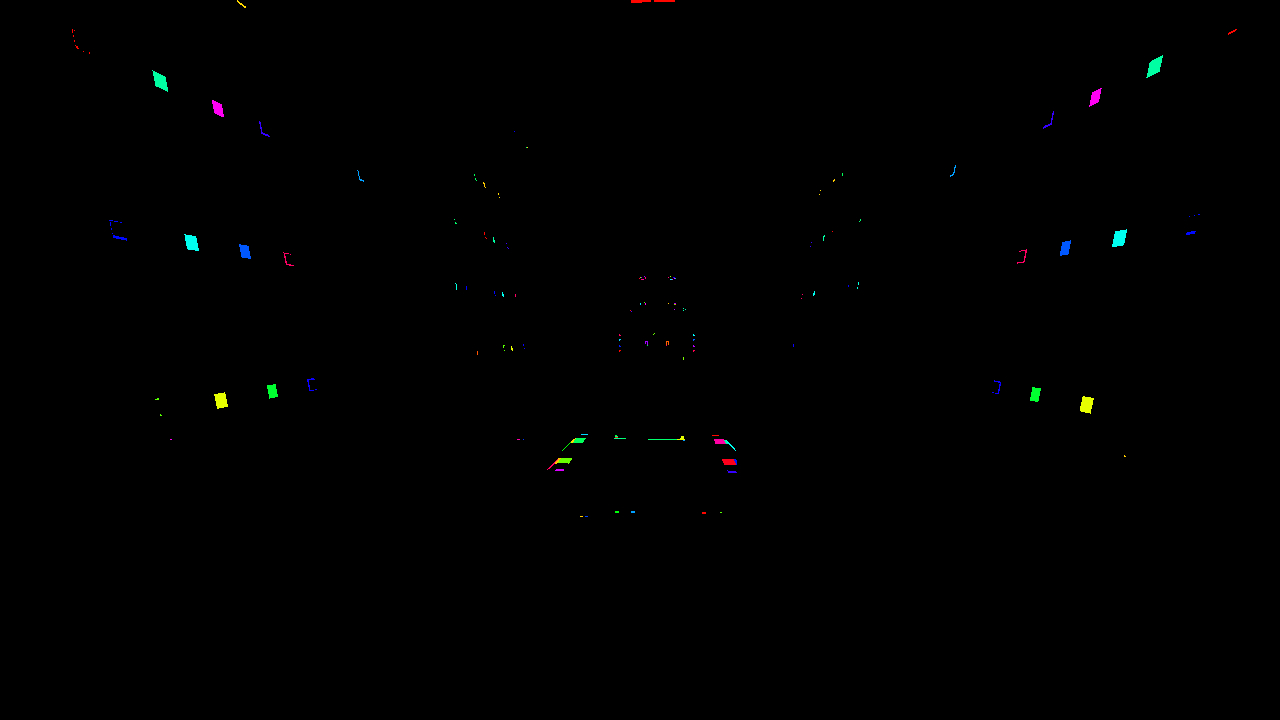
Mesh Decals
Up until what I’ve covered so far, there haven’t been many noticeable changes compared to Doom 2016. However, “mesh decals” is an addition to the mesh rendering pipeline introduced in Doom Eternal. Unlike the common decal workflow - which are placed freely in the environment - a mesh decal is placed during the mesh authoring pipeline by artists and so belong to the mesh. Before, Doom heavily relied on decals and stepped it up with the addition of so called “mesh decals” in this game for even better detailing and flexibility. “Mesh decals” are small decals like bolts, grills, bumps, stickers, … Just like a traditional decal, it can modify any property of the underlying surface like the normal, roughness, base color, …
To achieve this, the following geometry pass renders each of the decals’s ID into an 8-bit render target. Later during shading, this texture is sampled to retrieve the ID which is used to retrieve a projection matrix bound with each draw call. The matrix projects the pixel’s position from world space into texture space. These coordinates are then used to sample the decal and blend with the underlying material. This is extremely fast and allows artists to go crazy with massive amounts of decals. Because the IDs are rendered to an 8-bit texture, the maximum amount of decals per mesh would theoretically be 255.
One requirement for this, is that all decals are bound to the pipeline when drawing meshes. Doom Eternal uses a fully bindless render pipeline which allows them to bind all decal textures at once and dynamically index them in the shader. More on this bindless pipeline later as this is important to pull off other tricks they’ve done in this game.
Below, the mesh decal texture. The different IDs are coloured to visualize it better.
Light and Decal culling
Lights in Doom Eternal are all dynamic and there can be hundreds of lights in a view at a time. Besides this, as mentioned before, decals are of great importance in the game. In Doom 2016, this was already the case and the decal count can go up to thousands of them. This asks for a really solid culling approach to avoid massive pixel shader cost during shading later.
In Doom 2016, a CPU variant of clustered light culling was used to bucket lights and decals into frustum-shaped ‘froxels’ which are later read during shading by determining the cluster index from the pixel’s location. Each cluster has a screen size of 256px and 24 slices separated logarithmically to ensure a square-ish shape. This has become a common approach and similar approaches are used in many games like Detroit: Become Human and Just Cause.
Considering the increase in dynamic lights (hundreds) and decals (thousands) in Doom Eternal, the CPU clustered light culling didn’t suffice because the voxels are too coarse. For id Tech 7, a different approach was designed. They created a software rasterizer using compute shaders that executes in different stages. First, decals and lights are bound by hexahedra - A shape with 6 faces - and sent to the compute rasterizer pipeline. This projects the vertices into screen space. Next, a second compute shader clips the triangles against the screen bounds and buckets them into 256x256px screen tiles. At the same time, the light and decal entities are written into froxels just like in a traditional clustered culling approach. A following compute shader does similar work but at smaller 32x32px sized tiles. In each tile, entities that pass the depth test are marked in a bitfield. The last compute shader resolves these bitfields into the light lists which are eventually consumed by the lighting pass. What’s interesting is that the entity indices are still written into 256x256px sized 3D ‘froxels’ like the traditional clustered approach. Where there are large depth discontinuities, the minimum count of both the new light list and the clustered light list is used to determine to number of lights in each tile.
The above is a very condensed explanation of the process and probably doesn’t make much sense if you’re not very familiar with traditional rasterization. If you’d like to get a better understanding of this, I suggest doing some research into how this process works. Scratchapixel has a great explanation of how the process works.
Besides lights and decals, so called “Visibility Boxes” also get culled using this system which are used for gameplay visibility queries. Because the software rasterization is a long process for compute threads, occupancy is likely low and adding these extra visibility boxes has almost no extra cost. Considering this, the light culling is likely done asynchronously and thus has a very little net performance impact.
Screen Space Ambient Occlusion
Ambient occlusion is calculated in half resolution in a fairly standard way. 16 random rays are shot from each pixel’s position in the hemisphere. Using the depth buffer, the rays that intersect with geometry are determined. The more of these rays hit geometry, the more occlusion. The occlusion technique used here is called “Screen Space Directional Occlusion” or SSDO which is nicely described by Yuriy O’Donnell. Instead of traditionally storing the occlusion value in a single channel texture, directional occlusion is stored in a 3 component texture. The final occlusion can be evaluated with a dot product with the world normal of the pixel.
Because the effect is computed in half resolution, the result is rather noisy. A bilateral blur is applied using the depth buffer to improve quality. Ambient occlusion is usually rather low frequency so it’s not that noticeable that it’s blurry.
Opaque Forward pass
This is the pass where a lot of things come together. Compared to Doom 2016, here everything is fully forward rendered with only a handful of massive uber shaders. The entire game supposedly has about ~500 pipeline states and a dozen descriptor layouts. The first-person gun is rendered first, followed by the dynamic objects and then the static objects. Notice that the order doesn’t matter that much because we already have a depth buffer from the depth prepass that can reject pixels early that don’t match the depth in the depth buffer.

Much of the static geometry and characters have common shaders. This is where id Tech is quite different from any other AAA game. Many AAA game engines have shader graphs and static shader features that allow content creators to be very creative and go crazy with different kinds of materials. All these different materials each generate their own unique shader. The result is an explosion of shader permutations for all combinations of possible features. In id Tech, instead, almost all materials and features are combined into very few massive “uber shaders”. This allows the graphics pipeline to merge geometry more aggressively which can significantly improve performance. I will come back to this below.
Bindless resources
An interesting observation is that the entire graphics pipeline embraces the concept of ‘bindless resources’. This means that instead of binding e.g. a diffuse, specular, roughness, … textures before every draw call, the entire list of textures in the scene is bound at once. The textures in the list are accessed dynamically in the shader by means of indices that are passed to the shader using uniforms/constants. This means that any texture is accessible from any draw call and allows for many interesting optimizations, one of which I will describe next.
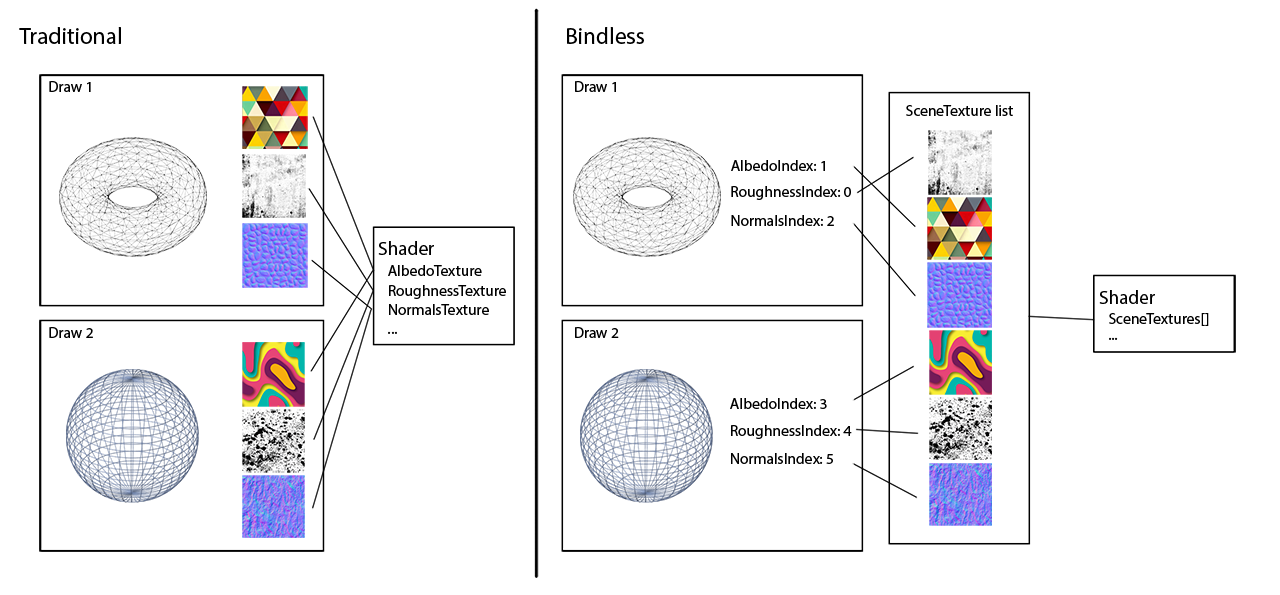
Dynamic draw call merging
On top of a fully bindless resource architecture, all geometry data is allocated from a single large buffer/pool. All geometry simply has an offset in this buffer.
Where these things come together, is the most interesting tech in id Tech 7: dynamic draw call merging. This relies on both the bindless architecture and the unified vertex memory. Before any rendering happens, a compute shader dynamically creates a new ‘indirect’ index buffer to effectively merge geometry from unrelated meshes into a single indirect draw call. This would never be achievable without bindless resources because this draw call merging can work across geometry that doesn’t share the same material properties. Merging geometry like this massively reduces draw calls and CPU submission time. The dynamic index buffer can get reused for both the depth prepass and lighting pass.
Reflections
Screen space reflections are most commonly done in a compute shader by raymarching from the pixel in world space in a reflected direction that depends on the roughness of the reflecting surface. This was no different in Doom 2016 which wrote a thin G-Buffer as part of the forward pass. However in Doom Eternal, this G-Buffer is no longer written. What’s curious about the uber shader in here, is that even the screen space reflections are computed directly in the forward shader as opposed to separately in a compute shader. I’m interested to understand the performance impact caused by such divergence in the pixel shader. It seems like they’ve tried to reduce memory bandwidth by reducing the amount of render targets at the cost of higher register pressure.
Effects done with screen space textures often suffer from visual artifacts when the information required is not available in the texture. This is especially noticeable with screen space reflections where reflected objects that are not visible, can’t be reflected. This problem is solved using static specular cube maps as a fallback which is also a very traditional approach.
As Doom Eternal is no longer using Mega-Texture, the feedback texture is also no longer created.
Particles
Simulation
In Doom Eternal, a part of GPU particle simulation is done on compute shaders. Some particle systems have dependencies on screen space information like the depth buffer to do things like collision. These simulations need to run after the depth prepass, other particle systems can run as early as possible in the frame and can usually be run on async compute. What’s interesting is that, as opposed to traditional compute shader particle simulation, simulation happens by executing a sequence of ‘commands’ defined in a command buffer in a compute shader. Each compute shader thread iterates through every command which each can contain several commands like ‘kill’, ‘emit’ or modify a parameter of the particle. It’s like a bytecode machine written in a shader. I don’t understand a huge amount of how this works in detail but this is based on “The Destiny Particle Architecture” by Brandon Whitley at Siggraph 2017 which uses a very similar approach and is used in many other games. I believe this is also similar to how the Niagara particle system works in Unreal Engine 4.
Lighting
Like in Doom 2016 and described in the 2016 Siggraph talk, particle lighting resolution is decoupled from the actual screen resolution. This allows them to control the resolution of each particle system depending on quality, screen size and manual control. For low frequency effects, lighting can usually be done at a much lower resolution without noticeable difference compared to e.g. sparks which would require a higher resolution. The lighting and dominant light direction are stored in 2 2048x2048px atlases which are accessible in all passes like any other texture in a table using bindless resources. Later down the pipeline, simple geometry is drawn sampling this particle atlas to render the particles.

Zoomed in section of the lighting atlas.
Sky and scattering
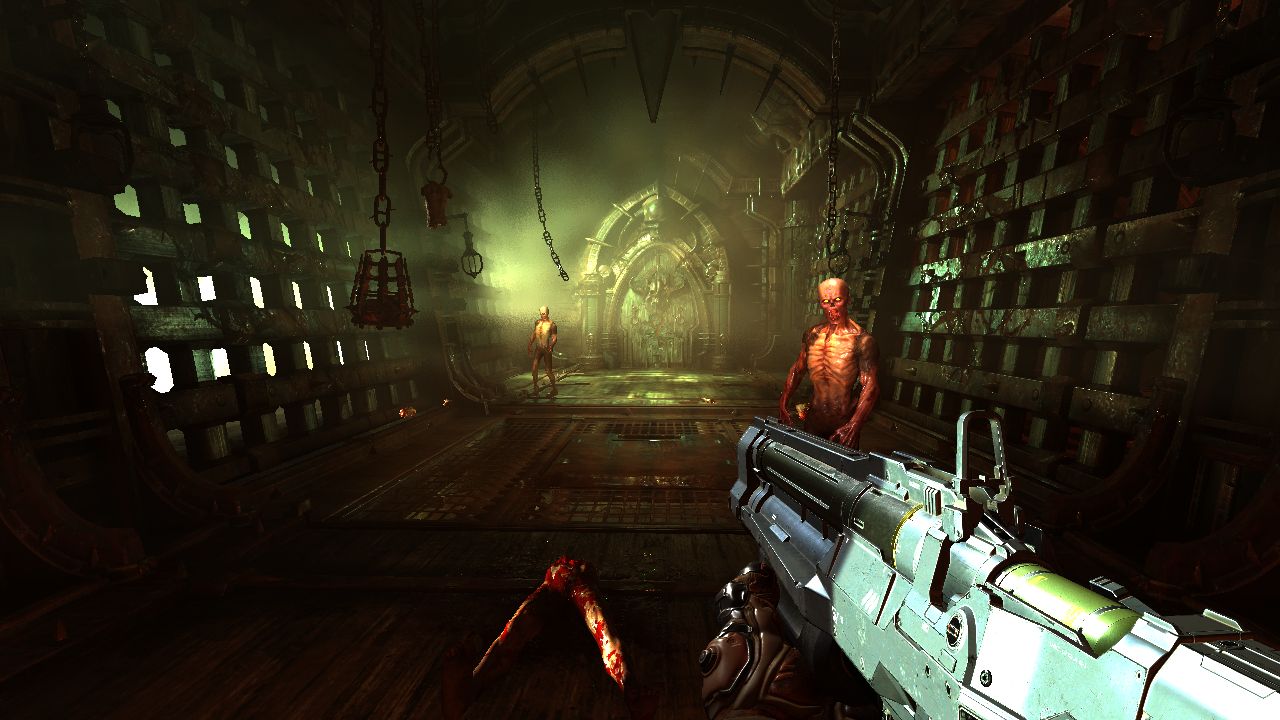
This section covers the volumetric lighting. This consists of 4 passes starting with generating a 3D LUT texture for the sky’s atmosphere by raymarching through the sky and towards the light.

It might not immediately make sense from the image what this texture represents but if we rotate it 90 degrees and stretch it horizontally, it becomes clear that this represents the atmosphere’s scattering. Because there is more variance/frequency vertically than horizontally, there is more vertical resolution allocated. The atmosphere is represented as a sphere so the horizontal rotation is commonly called ‘longitude’ and the vertical is ‘latitude’. The atmospheric scattering is calculated in a hemisphere covering 360 degrees of the longitude and 180 degrees of latitude for the upper half of the sphere. The LUT has 32 depth slices to cover different distances from the viewer. Instead of recomputing the sky data every frame, the computation cost is amortized over 32 frames.
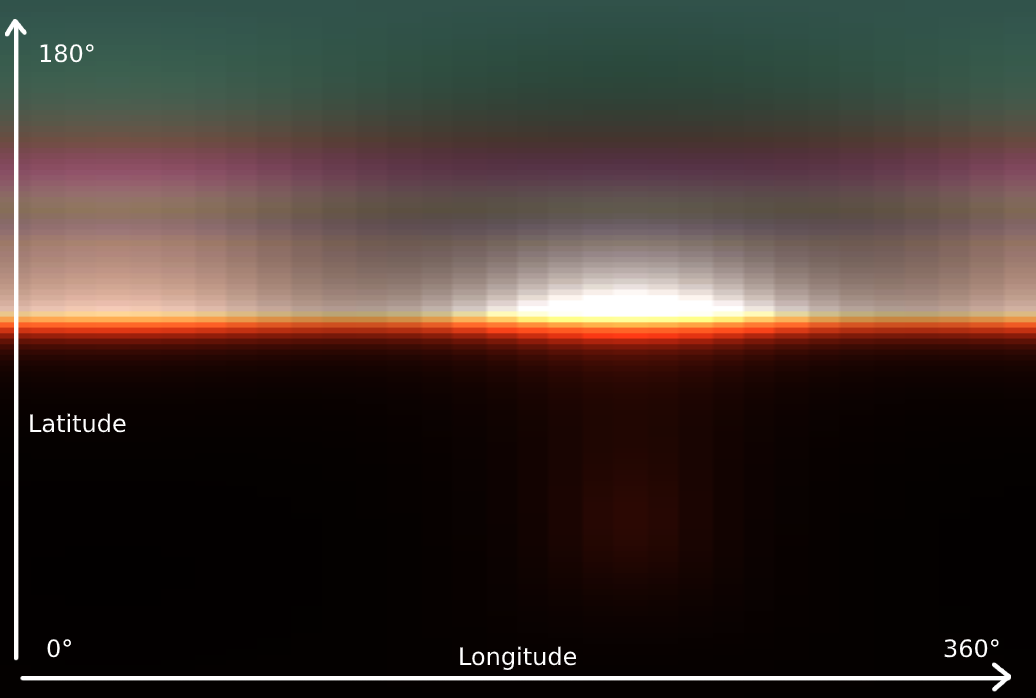
Using this LUT, the next pass computes light scattering per view ‘froxel’ similar to the clustered light culling froxels but smaller. A few slices of these can be seen here (front to back). The 3D textures are 160x90x64 which means froxels of 12x12 pixels in size which is a bit lower resolution than what I’ve seen in other games.

In the third pass, for each cell, the scattering data is propagated into each following cell towards the view, written into another 3D texture.
Finally, the volumetric lighting is composed on top of the rendered image by sampling the previously generated 3D texture based on the pixel depth.
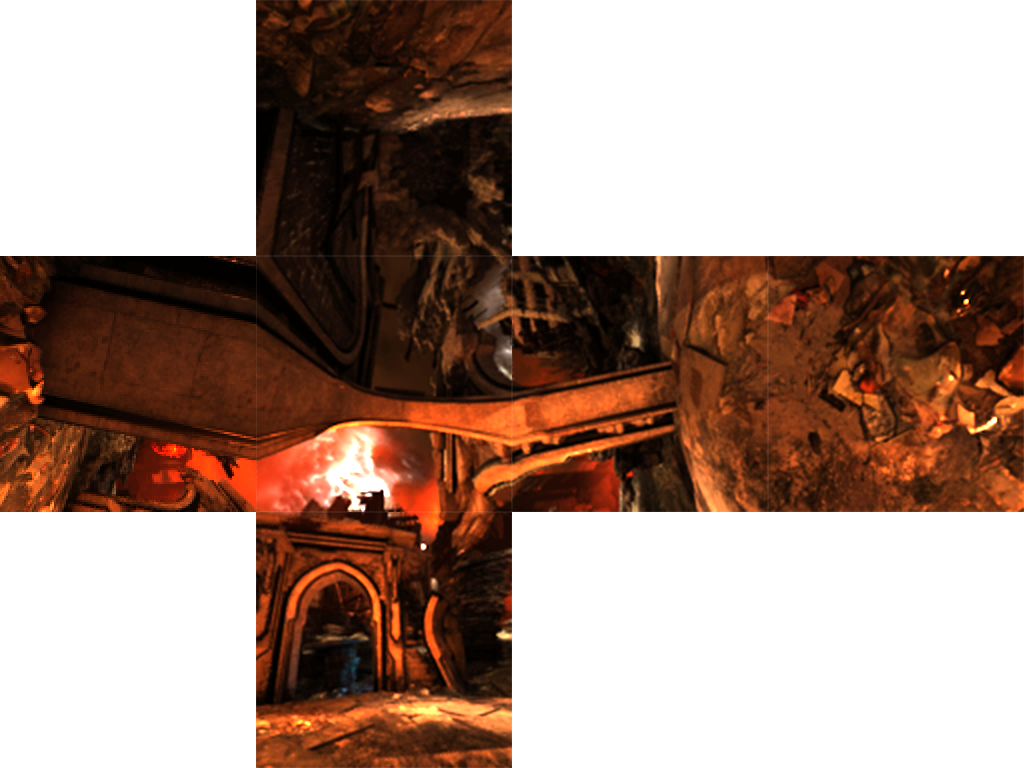
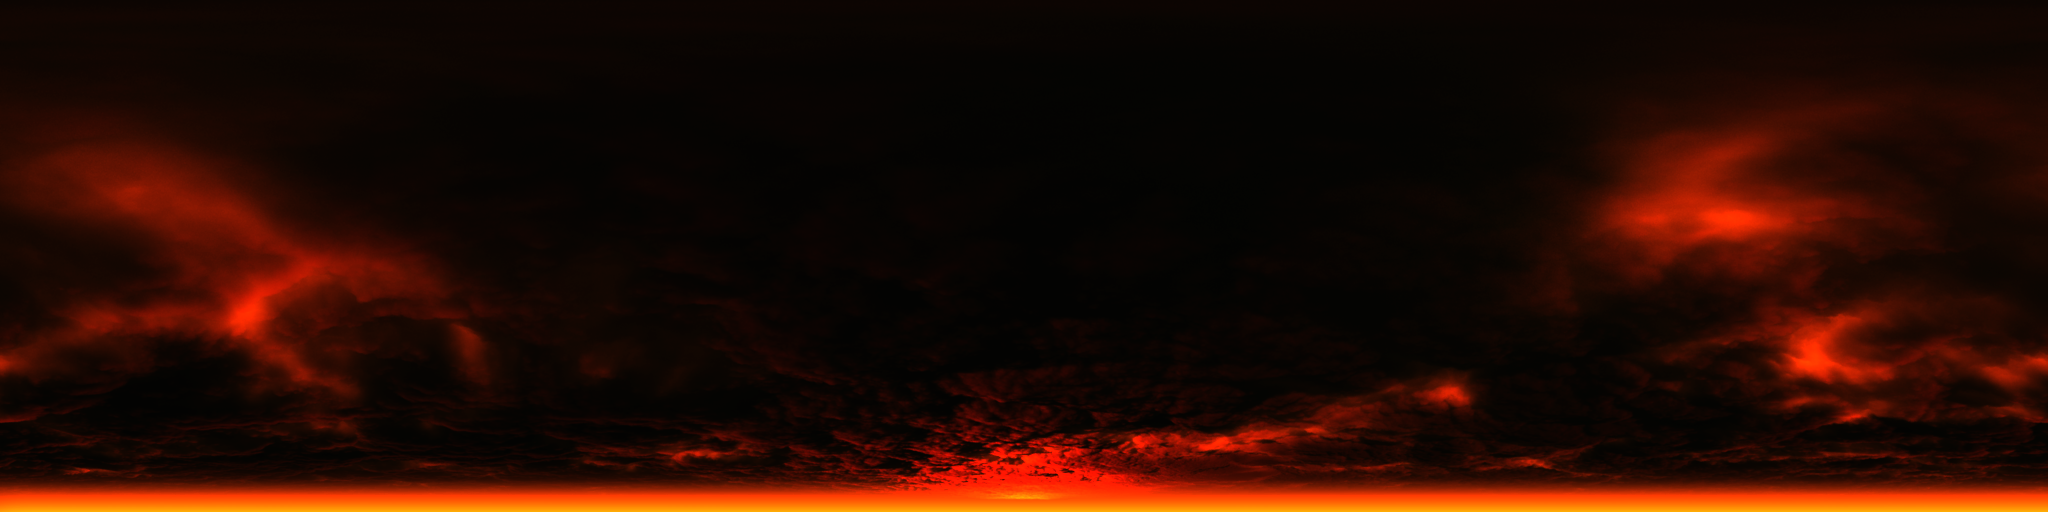
The actual ‘visible’ sky is rendered on a half sphere if it is visible. In this scene, the sky isn’t visible but below is an example of the sky in an outdoor scene.
Transparency
Transparency is achieved similarly to how it’s done in Doom 2016. It’s rendered in a forward pass after the opaque geometry and when the light scattering data is available. The scene texture is downsampled. Based on the surface smoothness, an appropriate mip level is selected to ‘fake’ the transparent surface. The light scattering data is also used to get good looking scattering inside the surface.
Below is an example mip-chain of the scene texture from another scene where there’s more transparent surfaces in view.

Only the relevant pixels seem to get downsampled for the transparency
UI
The User Interface is usually the last geometry pass in a frame. As commonly done, the UI is rendered into a secondary LDR (8-bit) full resolution render target and the color is pre-multiplied with the alpha. The UI gets composited with the HDR texture during the tone mapping phase. Generally, it’s not trivial to compose UI with the rest of the frame to work well with the HDR content. During tone mapping, the UI intensity usually gets scaled by a magic number to boost it so it looks balanced compared to the 3D content.
Post processing
Motion blur comes first which is a 2-pass effect that reads from the color texture and a customized velocity buffer. One pass takes 4 taps/samples along the vertical axis and the second pass takes 4 along the horizontal axis. The color samples get mixed based on the given motion of the pixel. The customized velocity buffer makes sure there is little ghosting and the player gun is excluded to prevent smearing.
Next up, the target exposure is computed by sequentially down sampling the color texture and getting the average luminance of each group of pixels. The result is a 1x1 RG texture containing the average luminance of the entire frame. This is a common technique to achieve the effect of eye adaption like in real life where your eyes automatically adapt to bright and dark environments. The average luminance is used to compute the exposure during tone mapping.
After this, Bloom is computed, also in a traditional way which is by extracting all color information above a certain threshold and sequentially downsampling that texture to blur it. In this scene in particular, there isn’t much bloom so it’s hard to get a good visualization of that, unfortunately.
Tone mapping is where all of the above comes together. A single compute shader does all this work:
- Distortion is applied
- Bloom texture is rendered on top
- Vignetting, camera dirt, chromatic aberration, lens flares and miscellaneous effects are computed
- Exposure value is derived from the average luminance
- Tone mapping brings the HDR color into the correct range for either LDR or HDR by using a custom tone map operator.
Finally, the UI is composited on top.
Distortion is achieved by generating a distortion texture which was rendered before the post processing pass. Geometry that generated distortion like heat haze from particle effects, is rendered into a new quarter-resolution render target which stores distortion data into the Red and Green channel and occlusion in Blue. The tone mapping step uses this texture to distort the image.

Conclusion
This concludes the high-level breakdown of a frame in Doom Eternal. I’m sure there are several things that I didn’t cover here and had an impact on the look of the game. Doom Eternal is in my opinion a great success and the team of id Software have managed to up the bar even further. I believe this game is something to look up to and learn from as id Software prove that a game with such high quality can be created with clever thinking and engineering. I look forward what id Software has to bring in the future.
Rip and tear, until it is done.
Reading material and references
- Doom 2016 Graphics Study
- Devil is in the Details - Siggraph 2016
- Doom Eternal – Digital Foundry Tech Review
- MJP - Bindless Texturing for Deferred Rendering and Decals
Updates
02/09/2020 - Update Ambient Occlusion description